Image Sprites
|
 Actually, iWeb themes have many graphical resources as default. In addition, users may need to add many images to a page, because iWeb provides an easy way to put images. This is one of the reasons that websites built by iWeb take longer time to load in general. To solve this issue, I suggest users make use of one of CSS techniques, Image Sprites through HTML snippet. Although this technique requires some minutes for merging multiple images to a single, it is really recommended to use this technique if you have to insert same size images to a page.
|
|
What is "Image Sprites"? / Why needs it?
An Image Sprites is a single image which is merged with multiple images. The reason why Image Sprites are needed instead of inserting multiple images into a page is to SAVE network bandwidth as well as reduce the number of server requests. Since inserting many images into a page will take longer time to load the pages, merging images into a single will help reduce loading time. For these reasons, I would recommend to use "CSS Image Sprites" function instead of inserting multiple images. Unfortunately, iWeb doesn't support this function as default, but through this tutorial, you would be able to merge multiple images into a single image as well as manipulating CSS.
"Image Sprites" is strongly recommended for iWeb because iWeb themes have many graphics as default. Therefore, reducing the number of images is necessary to let people as well as search engines visit your sites faster than before.
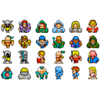
Let me give you an example for easier understandings. Here is lots of avatars I have to put into a page. Without Image Sprites, I have to insert 24 individual avatars into a page. It will generate 24 requests of your web server so that it will take a long time to load.
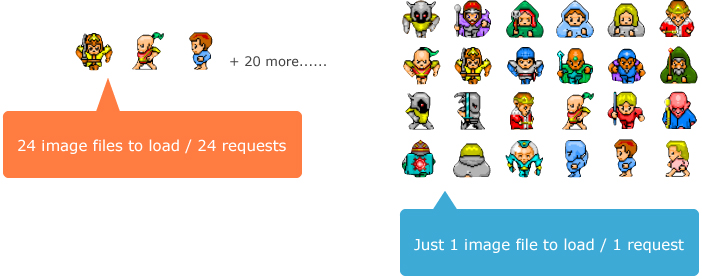
Through "Image Sprites", Only one request and one loading time will be generated. Which one do you think better?
In addition, with the help of "Image Sprites", you can make use of hover effect more easily. In this tutorial, I will describe how to use Image Sprites with hover effects.
To get started (Preparation)
-
You may need to prepare more than two same size images to be inserted into a page like the avatar image file above.
-
For this tutorial, I will use these 6 images below as an example. All six buttons' sizes are equal as 33x33. 3 left images will be used for normal links, and the rest of images will be used for hover effects.
     
-
These separated images will be merged to a single, and the result will be like below: (move cursor across the image.)

How to merge multiple images into a single image
-
There is really a good software I have found to enable Mac users to combine images without money.
-
GraphicConverter is a Macintosh shareware similar to Photoshop. You are allowed to use this software without limitation, for sure if you purchase it, you are able to use all features.

-
Download GraphicConverter X software.
-
Launch the application, and then select "File > Convert & Modify" on the top menu.
-
Once "Convert and Modify" menu is opened, please select "Concat" of Functions like the below image.
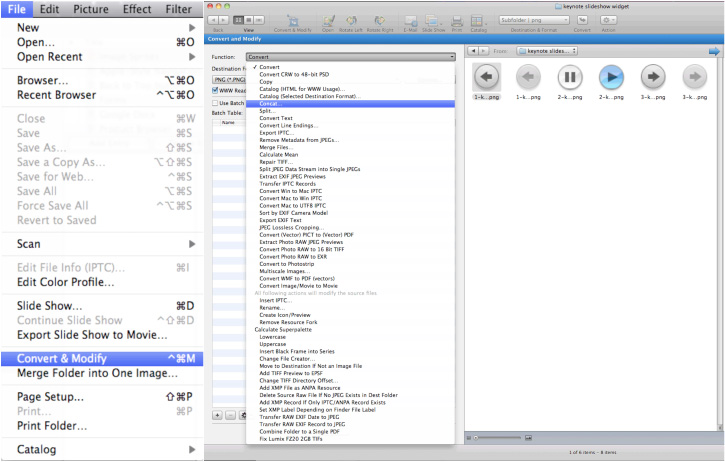
-
Go into the folder in which your images to be merged are located, then select all images to be merged.
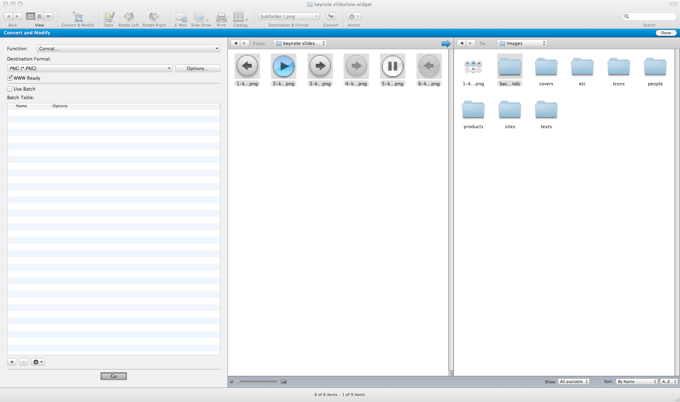
-
Here, an important thing is that you have to assign sequences to each image. For example, the first image file name would be "1.xxx", the second is "2.xxx", and so on... so that this application will know how they should be arranged when turing into a single file.
-
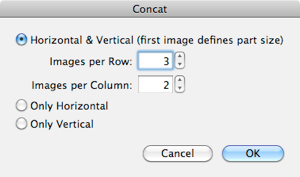
Once all images are selected, push "Go" button on the bottom-left. A window will show up like below:
-
For this example, I set "3 images per Row / 2 images per Column" for this setting. Since this sample images include hover effects images, it should have two rows. If you don't need to create hover effects, you can just choose "Only Horizontal".
-
Push "OK" button to merge the selected images.
-
Once you have done, you can see the merged image on the right browser.
-
This single image below will be used for "Image Sprites".

To get started (Preparation)
-
Take a look at this example code below: (I recommend you to download and use "TextWrangler" which is such a great Text editing tool for Mac.)
<style type="text/css">
.prev-button {width: 33px; height: 33px; border:none; background:url('/images/controllers.png') 0 0;}
a:hover .prev-button {width: 33px; height: 33px; border:none; background: url('/images/controllers.png') 0px -33px;}
.play-button  {width: 33px; height: 33px; border:none; background:url('/images/controllers.png') -33px 0;}
a:hover .play-button  {width: 33px; height: 33px; border:none; background: url('/images/controllers.png') -33px -33px;}
.next-button  {width: 33px; height: 33px; border:none; background:url('/images/controllers.png') -66px 0;}
a:hover .next-button  {width: 33px; height: 33px; border:none; background: url('/images/controllers.png') -66px -33px;}
</style>

<a href= "URL" target= "_top"><img class="prev-button" src="/images/img_trans.gif" /></a>
<a href= "URL" target= "_top"><img class="play-button" src="/images/img_trans.gif" /></a>
<a href= "URL" target= "_top"><img class="next-button" src="/images/img_trans.gif" /></a>
-
You can replace texts and values highlighted in RED. ".prev-button", ". play-button", and ". next-button" are called class.
You can change these names you want, but here, important is that "class" name should not begin with number due to compatibility issues. Any letter is OK. ("." should be in front.)
The reason why there are three classes above is that this example has three columns. Each column has its different class name. Thus the number of columns is equal to the number of columns of the merged image.
-
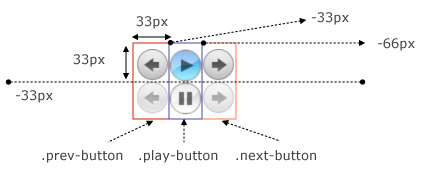
For more understandings, take a look at the below example:
-
As you can see, the first image's position is "0 0" (.prev-button). The second image (.play-button) position is "-33px 0". Because each width is set to 33px. Hence, the next image's position should be "-66px 0". On the other hand, for hover images, their Y position should be "-33px", because each height is set to 33px.
-
If you don't want an image to be linked to a specific web page, remove
href="URL" target="_top" tag.
-
Replace class names highlighted in RED such as "prev-button", "play-button", and "next-button" to yours.
-
Make sure the classes does not have "." at the very front. (e.g.
class="xxx")
-
Once you have done, go back to iWeb to embed this "Image Sprites" into a page.
-
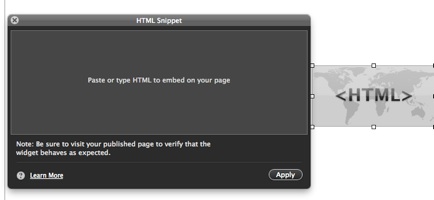
Insert a HTML snippet. Then paste the code into HTML snippet box. Please click "Apply" button on the HTML snippet box.
-
Make sure "img_trans.gif" (save link as to your local by right-click) and your merged image file are also uploaded to the right place of your web server such as "/images/" folder.
-
You are ready to check if "Image Sprites" works correctly. You will be able to reduce the number of server requests as well as save network bandwidth with applying this CSS technique.
|