Tips and Tricks for iWebsites
|
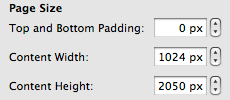
What is the most appropriate page size?
Actually there is no best answer for this question but we would like to let you know the most common website width. (The height is meaningless because a webpage's height is decided by contents length.) Due to the appearance of many mobile devices such as iPad, iPhone, and Android platforms, the width of the web page is much important than before. |
|
|
How can make your site load faster?
If you are good at HTML coding, you may already know this fact that a HTML code which is generated by iWeb is quite long when comparing to other general websites, and their iWebsites loading speed is quite slow. These problems are 100% TRUE. Especially those who apply any templates except for the white-blank template, would feel their site are extremely slow.
Once you apply these rules for your site, try to visit your site after emptying your browser's caches. You will feel your site is much lighter and faster than before. (We suggest to test "Internet Explorer" browser. From this browser, you will be able to feel much improved.) |
|
Don't use stroke in order to add borders to images.
As you know, iWeb does provide an easy function to add borders (strokes) to images. However nobody knows this behind secret of that function. That's very harmful to your site performance. If you add a stroke into an image, 4 additional image files will be automatically generated. |
|
|
What is the "Root" folder? Where is it?
"Root" folder is the highest (top-most) folder in the hierarchy. Root is the most important because this contains all files that your website need. To make use of many widgets and plugins through HTML snippet, you MUST know where Root is. |
|
How to include Spreadsheets in web pages?
An web page can NOT display Microsoft excel or numbers (iWork, Macintosh office) spreadsheets without other add-ons like active X. iWeb also can not show spreadsheets as default. It is just available to attach documents to enable people to download but we can naturally show spreadsheets using this trick below: |

|
|
Don't allow scrolling in iFrame for Touch devices!
iFrame is an element of HTML components which is used to embed different HTML pages into a page. However, in some cases the embedded pages can be longer than the assigned iFrame size. This case will result in that the iframe is oversized especially on mobile devices such as iPad, iPhone, and Android. It will corrupt your entire page design because iframe may hide other HTML elements. Here is a tip for avoiding the problem. |
|
To reduce image filesize, use Image Fill as tile on rectangle.
|
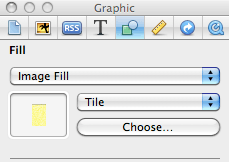 iWeb has a quite weird internal function to handle images. As one of the weird functions, if you add any shapes except for rectangle and then fill the shape with image tiles, the entire shape will turn into a big image. Even though there is HTML style tag,
 |
4 extra images will be generated if you add a border to an image!
|
 This is also one of the iWeb's weird functions to handle images. If you add a border around images, shapes, or text boxes, iWeb will create 4 small image files instead of adding HTML style tag
 |
Don't insert highly-compressed jpeg images to iWeb!
This is a bug or crucial problem of iWeb when handling images. Once a low or medium quality of JPEG image file is inserted to a page on iWeb, after published, the image size will be turned bigger than original. For other compressed images such as png, gif, and tiff, iWeb will reduce the image size smaller than original but for the highly-compressed JPEG file, it is an exceptional case. How to avoid this problem: |
|
Don't change opacity of shapes or text boxes in the Inspector!
|
 This compatibility problem is reported as one of the crucial issues of iWeb. iWeb users can easily change opacity of any shapes or images. For images, it doesn't make any problems. On the other hand, if you change opacity for shapes, it will result in very weird looks only in IE (Internet Explorer). The shape will appear as much bigger than the actual size. In this reason, MUST NOT use opacity function in Graphic tab of Inspector.
To avoid the problem in IE, we need to use an alternative way to get the same effect without resulting in any compatibility problems. Instead of changing opacity on inspector, open "Colors" window.
This compatibility problem is reported as one of the crucial issues of iWeb. iWeb users can easily change opacity of any shapes or images. For images, it doesn't make any problems. On the other hand, if you change opacity for shapes, it will result in very weird looks only in IE (Internet Explorer). The shape will appear as much bigger than the actual size. In this reason, MUST NOT use opacity function in Graphic tab of Inspector.
To avoid the problem in IE, we need to use an alternative way to get the same effect without resulting in any compatibility problems. Instead of changing opacity on inspector, open "Colors" window.|
Remove Main Text box which will be moved to a weird position on IE!
|
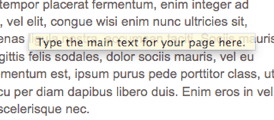 If you insert a page which is not a blank, there are several text boxes template pages include. You will see tooltips to let you know what purposes each text box have once you mouse over them, such as Title, Heading, and Main text. Main text box ("Type main text for your page here" tooltip) may cause a wrong positioning problem on specific web browsers, especially IE 6.

|
How to insert Table into a page on iWeb?
Table is a standard HTML component like text box. However iWeb does NOT allow to insert a HTML table element. You can insert a table by inserting HTML code into a HTML snippet but it is a quite time-consuming job. You can easily a same-looking table not real HTML table by using another Mac application. |
|
An image is gone away when you adjust a masked-image!
iWeb still has a bug that an image is disable once you adjust the image which is directly masked. In other words, you can create a shape, then drag an image into the shape in order to mask the image with the shape. This is very useful way to transform an image into a specific shape like circle, rectangle, star, and etc. However you will no longer adjust the image because the image will disappear after several adjustments. But you can avoid this bug. |

|

|
How can open a link of RSS Feed widget on the same window?
RSS Feed Widget, one of internal iWeb widgets, works great but you may find a problem already. The problem is that each link on the widget only opens the target urls from the new window not the same window. If you linked it to some external blogs, it may not be a problem but it will be an issue if you linked it to your blogs in your same site. Here, a simple trick to let you edit RSS Feed widget source code directly. |
|
Why does your site have no visitors or a little traffic?
iWeb is NOT friendly with search engines. Even if your site looks very beautiful and useful, it would be meaningless if there is no visitors or few. If you want to get more traffics, and spread out to your target markets, you should go through SEO processes and other essential tasks, eventually your site will be ranked up and getting popular. Outside iWeb several essential processes with Google should be done. |

|

|
How to manipulate HTML code without HTML snippet.
As you know, iWeb does NOT allow users to modify HTML code on itself because iWeb stores just binary resources in itself, and then it generates HTMLs once a website is published. That's why it is impossible to modify HTML code in iWeb. However, here is a trick to allow you to edit HTML codes by another application. |
|
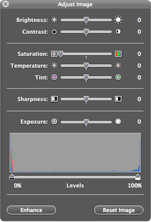
How to convert a image to Black and White image. One of the most useful features of iWeb would be integrated with great image controller called Adjust Image. It is really easy to handle and just dragging sliders of various properties makes a image look different. I recommend to use this image controller of iWeb instead of other external editor to save time and efforts. By this internal image editor, you can apply diverse effects to an image. Choose an image you want to apply Black and white effect to. Click Adjust button on the bottom menu to open image editor on iWeb. On the Adjust Image viewer, take a look at Saturation. Drag Saturation slider to zero (to left). It gets rid of colors, hence it will include black and white only. Like this trick you can manipulate an image to various styles you want. If you want to know this more in detail, go to Black - white image tutorials, then follow the process. |
|

|
How to insert a special font not web safe fonts like Arial.
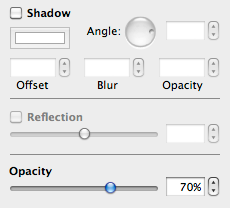
Basically, it is recommended to use standard web safe fonts such as Arial, Lucida Grande, Verdana, and other limited common fonts. This is because there are very various client environments. (HTML is interpreted by a web browser Not web server, that's why a specific font should be installed in local to show it correctly.) However, sometimes you may need to use special fonts having graphical styles. iWeb can do it. You should convert a text to an image. This is called "Imaging text" function. Select a text box which has special fonts. Then check on Shadow and make sure Offset is '0 pt', Blur is '0 pt', Opacity is '100%', and Angle is '0˚. The option values setting is used for None-shadow, just like flat-text. The text is turned into an image. It is no longer text. The text will appear constantly across the different web-browsers and platforms. If you want to know this more in detail, go to Text-image tutorials, then follow the process. |
|
A big problem of Shadow effects on some browsers. iWeb provides easy but great tools to handle images such as stroke, shadow, reflection, opacity and so on... However, some of them may cause some problems on specific browsers. In particular, shadow effect will let your image look very weird on Firefox, and IE. That's why I have never used this effect for images, instead of iWeb imaging tool, I manipulate images on Photoshop CS. Don't check on Shadow Effect for an image which has transparent areas like PNG, and TIFF. It will look terrible. The entire rectangle area will be shadowed, not an actual image area. In addition, don't apply Shadow effect to specific shapes except for Rectangle. The shadowed shapes will look very weird as well. Instead of iWeb imaging tool, I would recommend to use Photoshop Layer style (Emboss or Drop Shadow effect). This will be the only solution if you want to apply Shadow effect to images. |

|
|
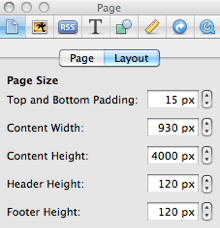
How can increase a page height more than 4000px? iWeb restricts the height of a page up to 4000px. (I don't know this reason why Apple Inc. created like that.) Hence, you can NOT build very long pages as default. Very long contents may not be good, sometimes it's unavoidable (I prefer single long page than multiple pages). As you may know from this site, some of pages are longer than 4000px. You can make it, either. Insert a blank Text Box to a page, then drag it to right above the footer. (You must use footer to execute this trick. You may need to read this tutorial: footer.) Once you drag the text box down and down, you will be noticed that the page's height is automatically being increased over 4000px. Now, you are allowed to go across the "4000px" border. |