Header Tag
|
 Header tag is one of the most necessary web elements along with Title, and Meta Tag regarding SEO (Search Engine Optimization). This is because search engines refer to Header tag in order to index pages. However, iWeb doesn't support to insert <h1> tag for users.
This point causes a critical problem to make people find your website built by iWeb very hard. That's why most of websites developed by iWeb don't rank high. Here, I would like to inform a better way to help your website rank higher by inserting header tags.
Header tag is one of the most necessary web elements along with Title, and Meta Tag regarding SEO (Search Engine Optimization). This is because search engines refer to Header tag in order to index pages. However, iWeb doesn't support to insert <h1> tag for users.
This point causes a critical problem to make people find your website built by iWeb very hard. That's why most of websites developed by iWeb don't rank high. Here, I would like to inform a better way to help your website rank higher by inserting header tags.
|
|
What is a Header Tag?
Header tags are coded as <h1>, <h2>, <h3>,...<h6>. It is similar to <p> tag (paragraph) but it can be used to identify what topic is on a page. Therefore, <h1> should be used only one time in a page.
If you want to insert more header tags, you can use next number like <h2>.. up to <h6>. Search engines like Google use these header tag, title, and url, and other elements when they index pages. Hence, if you want your website to rank higher than before, I would recommend to insert header tag to each pages.
Requirements to insert Header Tag to your web pages
Title Tag: You would learn how to add Title tags <title>, and head tags <head> to each pages for your website. This previous tutorial should be experienced because we need to set style "<style>" for header tags.
Replace HTML: This tutorial is also required to learn, because you need to know how to replace HTML code by using "MassReplaceIt" software.
How to insert Header Tag for iWebsites
-
Add Text box to a page. Then, please type any important topic you want to use as Header tag.
-
Wrap the sentence with <h1> and </h1> like the image below.

-
Here, the important thing is that don't change fonts and other properties of the text box you just added. Changing styles of the text box is useless. (But, it is possible to change the size of font and text box.) You will know the reason later.
-
If you have done, please publish your website into the local folder you set on iWeb.
-
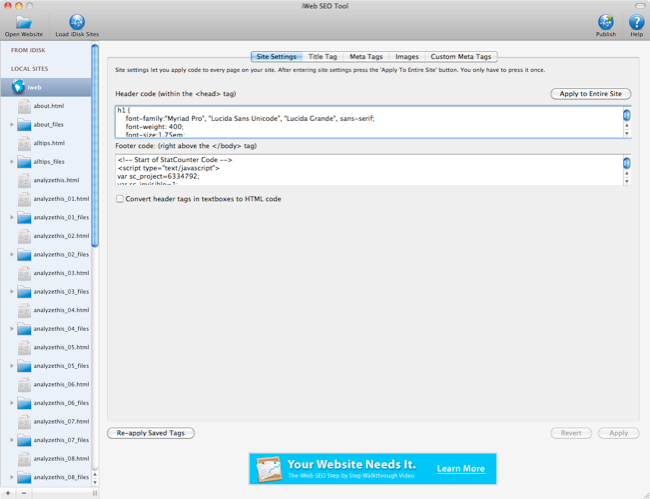
Open "iWeb SEO Tool" application, then make your website folder appear on the list like below.
-
Select the root of your website (your website's root folder name) in order to apply settings to every page your website includes.
-
Here, you can copy h1 style HTML code below. You can replace the values highlighted in RED. You can learn about how to set font style, here: http://www.w3schools.com/css/css_font.asp. (This is such a great website for learning HTML.)
<style>
	body {font-size:100%;}
    h1 {
        font-family:"Lucida Sans Unicode", "Lucida Grande", sans-serif;
        font-weight: 400;
        font-size:1.75em;
        color:#407AAA;
        text-align: center;
        margin: 0px 0;
        padding: 0px 0px;
        width: 900px;
    }
    h2 {
        font-family:"Lucida Sans Unicode", "Lucida Grande", sans-serif;
        font-weight: 400;
        font-size:1em;
        color:#407AAA;
        text-align: center;
        margin: 0px 0px;
        padding: 0px 0px;
        width: 900px;
    }
    </style>
-
Here is a simple tip about Font size. (1em = 16px. You can calculate the best font size.)
-
Once you have modified, you can copy and paste the HTML codes into Header code box in the application. Press "Apply to Entire Site", it will automatically store all settings. Even if you open this application in the next time, it will restore all settings you did once you add your website folder.
-
Header Style tags are successfully inserted into every page of your website. The next task you need to do is to replace "<h1>" (<h1> is represented as "<h1>" in the HTML code.) in the text box to real "<h1>" HTML code by using MassReplaceIt application. ("</h1>" is "</h1>" as HTML)
-
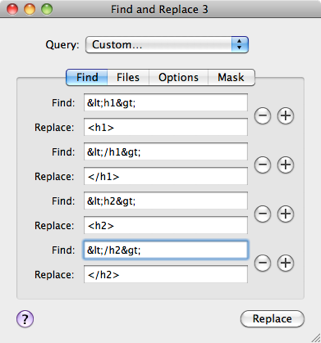
Open "MassReplaceIt" application, and then select "Query" you want to use for your website or you can add right now.
-
Add Find/Replace Field by pressing "+" button, and then make it look like below.
-
If you complete to input all, press "Replace" button at the bottom.
-
You will see what pages will be applied according to these queries. Press "Replace All" button to apply to all of them.
-
Everything is done. You just need to check whether modified pages show the Headers correctly or not on your web browsers. I would recommend to try it on Safari, Firefox, and IE as well. Some browsers interpret header tags' style differently.
-
The one thing you would need to remind is whenever you modify pages which include Header tags, "<h1>" on iWeb, you should do the previous process again just as you followed.
You must do this trick every time when you publish your site.
|