Image map
|
 An Image map is a useful HTML element, which is used for mapping different areas with links to a single image. The different areas (spots) can be clickable and linked to different destinations. Therefore, with the help of Image map, it is possible to save network bandwidth by merging multiple images into a single file. Even though iWeb doesn't provide this powerful feature as default, you can easily build your own Image maps on your site through this tutorial.
|
|
What is "Image map"?
An Image map is one of the HTML elements, which allows people to click different areas of a single image. These different areas (spots) can be linked to different destinations. Therefore, if you want to make multiple links to an image, "Image map" is the best solution.
Unfortunately, iWeb doesn't provide this feature even though "Image map" is very common.
Through this tutorial, you can insert Image maps into your site through HTML snippet.
Why / when do you need "Image map"?
1. When you want to insert multiple links into a single image.
2. You can save network bandwidth because you can merge multiple images into a single.
3. Mapping each different area to different destination.
How to create your own Image map
-
There are several software to create Image map, but they are not free. Actually, I don't think purchasing them is worth just for Image map.
Instead of buying, I would like to introduce a free online tool. Totally free, super easy, and same result as other charged tools. Please, go to http://www.image-maps.com/.

-
Prepare an image which will be inserted into your site as an Image map. You need to adjust the image's dimensions before getting the HTML code of Image map.
-
You can see the page below. First of all, click "Browse" button, then select an image which will be used as Image map.
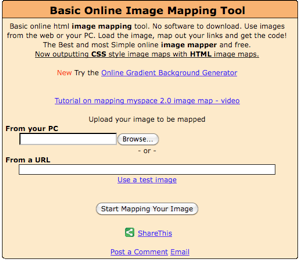
-
After you have chosen an image, please push "Start Mapping Your Image" button.
-
If you moved to the next page, click "continue to next step".
-
I selected a still-cut of the movie, "Titanic" as an example.
-
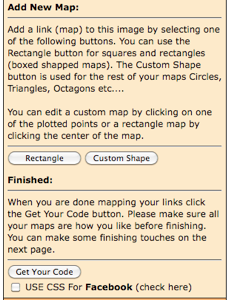
Your image is placed on the left side, and on the right side, there are several options. Actually, you don't need to check on any options. Just check off all options.
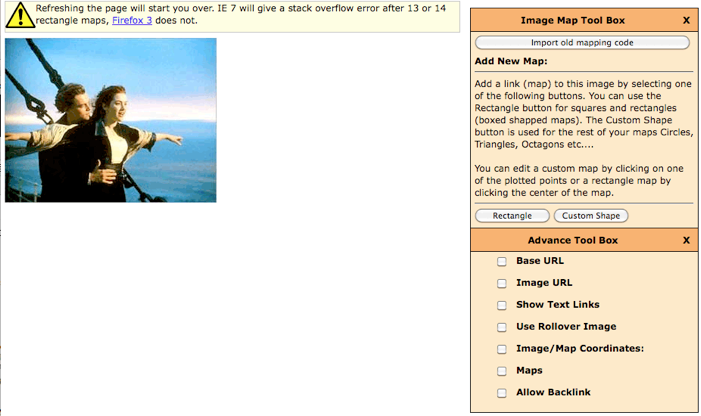
-
Click "Rectangle" button on the right side, then move & resize the rectangle box onto which you want to make a clickable area.
-
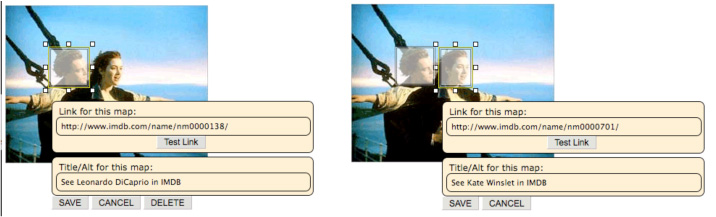
In this example, I'm going to make two clickable areas: "Leonardo DiCaprio", and "Kate Winslet". Each spot will be linked to their filmographies in IMDB.com.
-
Take a look at what I did below:
-
Input an URL which the rectangle area will be linked to, and description of the link. (The title will be used as Tooltip.)
-
You can make multiple clickable areas. If you want to make multiple clickable areas, repeat this.
-
For sure, you can make not only rectangle areas, but also different shape areas by clicking "Custom shape", and then making points. (The area will turn into "polygon".)
-
The destination links can be relative (without "http://") or absolute paths including "http://".
-
If you want to edit links or titles of the clickable areas, select the box, and then modify them.
-
If you have made all links, please click "Get Your Code" button.
-
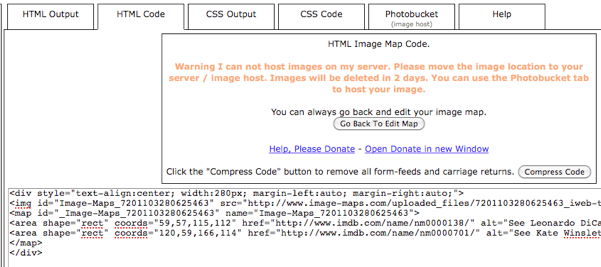
If you moved to the next page like below, select "HTML code" tab on the top.
-
Copy the HTML code, then paste it into TextWrangler or TextEdit. (I recommend you to download and use "TextWrangler" which is really a great Text editing tool for Mac.)
-
The source code may look like below:
<div style="text-align:center; width:280px; margin-left:auto; margin-right:auto;">
<img id="Image-Maps_7201103280625463" src="http://www.image-maps.com/uploaded_files/7201103280625463_iweb-tutorials-image-map-example.jpg" usemap="#Image-Maps_7201103280625463" border="0" width="280" height="218" alt="" />
<map id="_Image-Maps_7201103280625463" name="Image-Maps_7201103280625463">
<area shape="rect" coords="59,57,115,112" href="http://www.imdb.com/name/nm0000138/" target="_blank" alt="See Leonardo DiCaprio in IMDB" title="See Leonardo DiCaprio in IMDB"    />
<area shape="rect" coords="120,59,166,114" href="http://www.imdb.com/name/nm0000701/" target="_blank" alt="See Kate Winslet in IMDB" title="See Kate Winslet in IMDB"    />
</map>
</div>
-
You MUST replace the image path highlighted in RED. This Image-map site does not provide hosting your images. Therefore, you should upload the image into "images" folder or a different folder of your web server.
-
Then replace the image URL to the right path. For example, I replaced "http://www.image-maps.com/uploaded_files/7201103280625463_iweb-tutorials-image-map-example.jpg" to "/images/iweb-tutorials-image-map-example.jpg".
-
You have to decide how the link is opened, "new window" or "same window". If you want the destination page to be opened in the new window, insert
target="_blank", on the other hand, if you want to open it on the same window, input target="_top" within <area> tag. Please, refer to the example above.
-
Take a look at the example of mine below. This Titanic still-cut consists of two different clickable areas. One is on "Leonardo DiCaprio" face, and another is linked to "Kate Winslet" face. You can test how it works below:
-
Once you have done, copy the entire code.
-
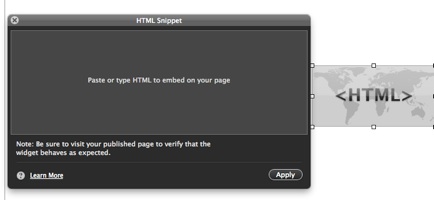
Insert a HTML snippet. Then paste the code into HTML snippet box.
-
Click "Apply" button on the HTML snippet box, and see if the image map works correctly.
-
Make sure that the image file which is used as an Image map, is uploaded to the right folder of your web server where you define in the code via FTP. (If you do not know how to handle FTP, please learn this tutorial: Publish to Local Folder)
|