Google Custom Search
|
 If your site has many contents, it would be a great way to enable people to search specific contents they want to find. To embed a search engine to a site, you may require database or other complicated process. However, Google provides the best solution to let us eliminate any worries and fees generated from Search engine. This is called Google Custom Search Engine.
Through this tutorial or Pro Pack, you can integrate a free search engine with your site.
If your site has many contents, it would be a great way to enable people to search specific contents they want to find. To embed a search engine to a site, you may require database or other complicated process. However, Google provides the best solution to let us eliminate any worries and fees generated from Search engine. This is called Google Custom Search Engine.
Through this tutorial or Pro Pack, you can integrate a free search engine with your site.
|
|
Make your own Google custom search
If you don't have "Google custom search" yet, please sign up Google custom search.
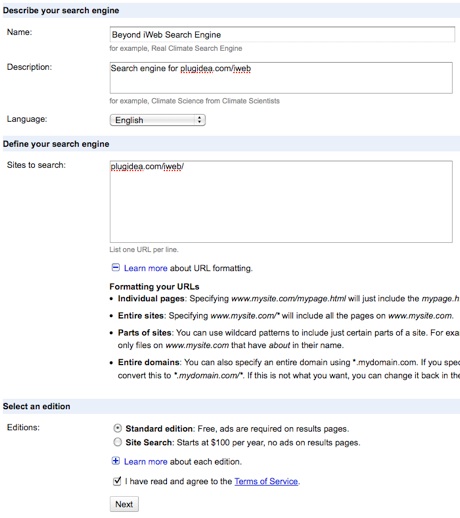
Fill out every field like below. The most important thing is to input your website domain to "Sites to search" field. You will get your own custom search for your site.
If you're interested in making your own custom search field which is integrated with your navigation menu like apple.com, go to Apple style navigation with custom search. (This is only available in Pro Pack.)
Pro Pack will automatically generate your custom search code so you do not need to grab your custom code.
If you do not have Pro Pack, you can simply get your custom search code via "Get code" button. Then paste it into a HTML snippet.
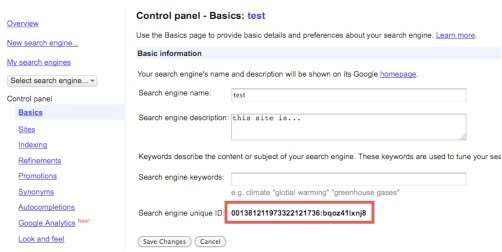
How to get your "Search engine unique ID"
Click "Basics" on the left menu, and you will get your own "Search engine unique ID" which will be used for this widget. This menu screen may be different.
Optional settings only for iWebsites
-
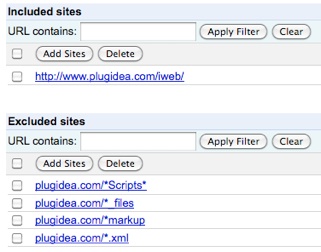
Click "Sites" on the left menu of the google custom search page.
-
Click "Add Sites" button, and type your website domain
-
Take a look at "Excluded sites" part. This is the most important setting to make your own smart search engine. If you don't add urls to Excluded sites, your search engine may not work well. Many useless contents or trashes will be searched if you don't make any changes on this. Hence, you should add these settings below:
-
Click "Add Sites" button in the "Excluded sites", then select "Exclude sites in bulk" menu, and then copy " paste below:
YOUR DOMAIN/*Scripts*
YOUR DOMAIN/*_files
YOUR DOMAIN/*markup
YOUR DOMAIN/*.xml

-
You should replace "YOUR DOMAIN" to your site's domain. You don't need to type "http://" as well as "www". If you don't input "www", all sub-domains will be included to enable Google to search.
-
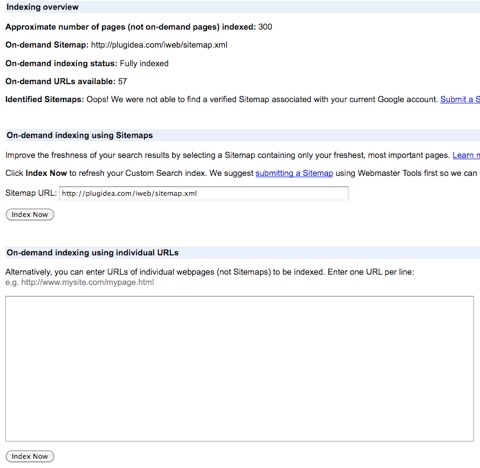
Next task is to let Google index your site. Click "Indexing" on the left menu.
-
For the use of "Indexing", it is recommended to add your site to Google Webmaster Tools. Once your site is successfully added to Google Webmaster Tools, and you submitted "sitemap.xml" to that as well, you can use "On-demand indexing using Sitemaps" right now.
-
Make sure your sitemap file's url is correctly input on "Sitemap URL" field. If right, click "Index Now" button to refresh your Custom Search index.
How to build your own search result page
-
You can choose where to show the search result: Google hosting page or your custom search result page in your site. You don't need to do anything if you choose Google hosting page (default) but if you want to create your own search result page, please follow below steps. (Or you can simply insert your search element code into your page within <body>...</body> tag.)
-
Click "Get code", and copy your "Custom Search element code".

-
Create "search" page on iWeb. ("search.html" is recommended.)
-
Add a Text box to the page you want to show search results, and then place it on your desired place.
-
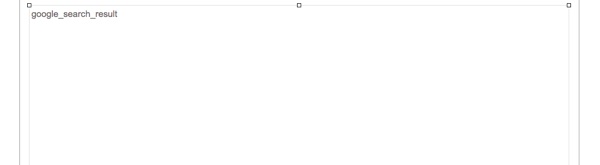
Type "google_search_result" or any short words you want.
-
Here, the most important is Don't change FONT TYPE, SIZE, and ANY OTHER PROPERTIES of TEXT. Keep it as default. Just type words in the text box.
-
Resize the text box. At least, the size of the text box should be bigger than 700px / 1100px at least.
-
Save your website, and then publish your site to Local Folder. If you didn't change the publishing settings on iWeb yet, please, change it to "Publish to Local Folder" right now.
-
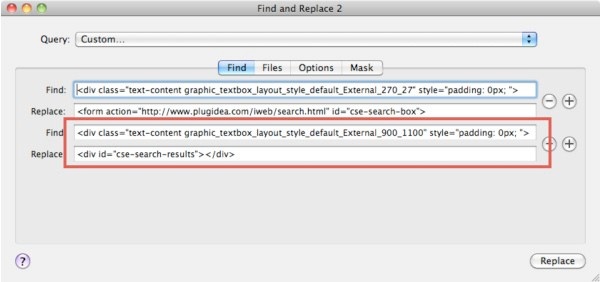
Open "MassReplaceIt" application, and then select "Query" you want to use for your website or you can add right now. (If you didn't master Replace HTML tutorial yet, please learn it now.
-
Add Find / Replace Field by pressing "+" button. Then paste your custom search code which you copied from Google, into "Replace:" field of "MassReplaceIt" application.
-
Open a text editor, and then copy and paste the HTML code below:
<div class="text-content graphic_textbox_layout_style_default_External_900_1100" style="padding: 0px; ">"
    <div class="graphic_textbox_layout_style_default">"
    <p style="padding-bottom: 0pt; padding-top: 0pt; " class="Body">google_search_result</p>"
    </div>"
    </div>
-
Replace the words highlighted in RED. For example, if the size of your text box in which you input "google_search_result", is 800px / 1000px, replace 900 -> 800, and 1100 -> 1000. In addition, you should replace "google_search_result" to the words you input. For sure if it is same, leave it.
-
If you have replaced it correctly, please copy the HTML code, then paste it into "Find:" field of "MassReplaceIt" application. It may look like below:
-
Press "Replace" button at the bottom to apply.
-
You would be noticed at what pages will be applied according to these queries. (Of course you may have other queries on the list.) Press "Replace All" button to apply to all of them.
-
You will need to check if your custom search engine works correctly.
* It may take a couple of days for the search engine to work appropriately because Google has to index all of pages on your site to be searched.
|